
I've been desperately trying to get over a terrible case of the flu. I literally hate that I've been at home and haven't felt like stamping or creating as much as I would have liked.
I follow an amazing Australian Stampin' Up! demonstrator named Kylie Bertucci. See her blog here. She is hosting an International Blog Challenge starting today and I decided I would participate. The theme is "Thank You". I personally think that not near enough thank you notes are mailed in this day of email & Facebook, but we should all try harder, right? (This card will go out to one of my customers.) There will be voting during this challenge and 5 lucky participants will win a coveted spot in an International Blog Hop that Kylie hosts. Click on the link above, which will take you to Kylie's blog. Cast your votes...you get to pick your 5 favorites.
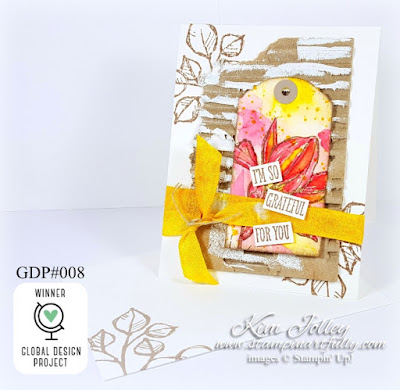
For my entry, I decided on a watercolor card. All products are Stampin' Up! I love the Remarkable You stamp set. The images offer so much inspiration and possibility.

I decided to use the calla lily image. I inked up the flower portion of the image with Melon Mambo, then used an Old Olive marker to color the stem. Once I stamped it on watercolor paper, I just applied water from the border of the image and pulled color to the center, adding more Melon Mambo when I needed it and using Daffodil Delight for the center portion of the flower. I made my own "paint palette" by tapping each ink pad on the edge of one of my acrylic stamping blocks. A CD case also makes a great palette.

To add some interest to the background, I sponged Daffodil Delight on top of one of the masks (stencils) from Happy Patterns Decorative Masks, then used one of the Gorgeous Grunge stamps to add what looks like paint splatters. I cut the word using one of the Greetings Thinlits dies. I think using the negative instead of the actual word added some interest to this project.
Now for a little tip: see what appears to look almost like a twisty tie in the photo below?

I've been playing with seeing how I can break down the properties of a piece of cardstock without just disintegrating it in order to use it for interesting embellishments. I trimmed a very narrow piece of the Melon Mambo cardstock (think skinny strip, maybe an 1/8 inch wide) and slightly wet it. Once it was wet, not soaking wet, just slightly wet, I rolled it back & forth in my hands kind of like you would an ink pen. (while holding it, put your hands together like you are going to clap, then slide your hands back an forth) I haven't ventured in to making videos yet, but this would be the time for one...Once it looks the way you want it to look, let it dry. I painted my piece with clear Wink of Stella to give it a little sparkle.
I hope you enjoyed this project. Here are a couple of older projects using the same stamp set. Click on the photo to take you to the original blog post.

Supply list:

Please
use the hostess code shown in the top right corner when ordering online, unless
your order will total $150 before shipping & tax. At that point, you become
your own hostess and get all of the rewards. Don't forget that Saleabration is winding down. You have until March 31 to earn your Salebration freebie(s). Click on the catalog link at the very top of this page to see what your choices are. Please keep in mind if you choose
"no contact" from the demonstrator, I'm unable to see your name to
send a thank you note.
Thanks,
Kim
You are very talented!! I love your entry and also the gorgeous 'extras'! And now I can't wait to see more of your artistry.
ReplyDeleteOh Kim this is so stunning! The subtle sponging with the decorative masks is so lovely. Thank you for taking part in our international blog highlight and making it such a success! All the best with the voting.
ReplyDeleteGreat coloring. Angexx
ReplyDeleteThis is stunning Kim! I love everything about it. Xoxo
ReplyDeleteLovely card, like the subtle colors.
ReplyDeleteI love the way you have offset the layers! What a lovely card!
ReplyDeleteSuch a lovely card Kim.....love the use of colours
ReplyDeleteGorgeous!
ReplyDelete