Friday, March 31, 2017

Freebie From Me Offer and Sale-A-Bration Ends Today!


My special offer for a free embossing folder with purchase is toward the end of this post, but first...a sample card made using the the stamp set Mediterranean Moments (shown in the Occasions Catalog) with a matching envelope made using the Envelope Punch Board.  Sentiment is from the Sprinkles of Life stamp set. The new Watercolor Pencils were used to lightly color the image in. All products Stampin' Up!


The Stampin' Up! Occasions catalog and Sale-a-Bration catalog links to the pdf versions are on the right side-bar.  For every $50 spent from any catalog (before tax & shipping) you earn a FREE item from the Sale-A-Bration catalogs.  The Sale-A-Bration catalogs are only good through March 31, 2017.


In addition to the items available in the Sale-A-Bration catalogs, Stampin' Up! released additions to the freebie list on March 21.  Again, you only have until March 31, 2017 to take advantage of the free items and they are only as long as supplies last.  


Please note that if you want one of the above for your freebie after spending $50 (before tax & shipping), you will need to use the item numbers below. 


Freebie from me:


Know what is even better than getting one freebie with a $50 purchase (not including tax & shipping)? Getting 2 freebies!! That's right, purchase at least $50 before tax & shipping through my online store and receive your choice of an embossing folder valued at $7.50 or less. There are 11 embossing folders available currently at this price point and you get to pick one if you make a qualifying purchase from me before the end of Sale-A-Bration, which is March 31. Your free embossing folder will be coming directly from me. This is my promotion, not a Stampin' Up! promotion. It will be mailed later in April after my current hostess code is closed out. Just place an online order through the "shop with me" link below. Make sure you see my name as the demonstrator you are purchasing from. Please note: If you choose "no contact" from demonstrator, I will NOT be able to see who you are to mail you your embossing folder. Once you place your order, email me with the item number and name of folder you wish to have at stampinartfully@gmail.com

The rumor is TRUE...


Read more about the Stampin' Up! Ultimate Bundle by clicking on the photo above. Time is running out for the best ever deal on the Stampin' Up! Ultimate bundle. Purchase the $99 starter kit plus 2 stamp sets of your choice! The extra 2 stamp set offer ends March 31! Click here to become a part of my team.


Do you have a Stampin' Up! demonstrator? If not, I would love to be your source for these amazing products (unless you want to take advantage of the opportunity above) and hopefully give you a good dose of inspiration from time to time. This is not just a hobby for me, it is a passion! Click here or on the header above to find out more info on how you can earn free stamp sets just by shopping with me. Earn Frequent Buyer Rewards!

Please use the hostess code shown in the top right corner when ordering online, unless your order will total $150 before shipping & tax. At that point, you become your own hostess and get all the rewards! 


As always, let me know if you have any questions about the project or the products used. Thanks for visiting my blog.

Artfully Yours,


Kim


Wednesday, March 29, 2017

Freebie From Me, Samples, & Sale-A-Bration Is Almost Over!

My special offer for a free embossing folder with purchase is toward the end of this post, but first...3 sample cards made using the Lift Me Up Bundle shown in the Occasions Catalog. (with a few added images from other sets) Unless noted, all products Stampin' Up!


The background above was made by simply "swishing" stripes on to watercolor paper using an Aquapainter and Marina Mist ink. 


I love how the sample above has almost a vintage-y feel. The bottom layer is Very Vanilla. Doesn't the Writing Notes background  stamp add to this look? I also love the fact that vellum softens everything. 


The color on the balloon above was achieved using my #foolproofwatercolor method to apply inks to watercolor paper before using the die to cut out the balloon. The wispy looking threads behind it is just a small piece of frayed cheesecloth from my stash. 


The Stampin' Up! Occasions catalog and Sale-a-Bration catalog links to the pdf versions are on the right side-bar.  For every $50 spent from any catalog (before tax & shipping) you earn a FREE item from the Sale-A-Bration catalogs.  The Sale-A-Bration catalogs are only good through March 31, 2017.

In addition to the items available in the Sale-A-Bration catalogs, Stampin' Up! released additions to the freebie list on March 21.  Again, you only have until March 31, 2017 to take advantage of the free items and they are only as long as supplies last.  


Please note that if you want one of the above for your freebie after spending $50 (before tax & shipping), you will need to use the item numbers below. 


Freebie from me:
Know what is even better than getting one freebie with a $50 purchase (not including tax & shipping)? Getting 2 freebies!! That's right, purchase at least $50 before tax & shipping through my online store and receive your choice of an embossing folder valued at $7.50 or less. There are 11 embossing folders available currently at this price point and you get to pick one if you make a qualifying purchase from me before the end of Sale-A-Bration, which is March 31. Your free embossing folder will be coming directly from me. This is my promotion, not a Stampin' Up! promotion. It will be mailed later in April after my current hostess code is closed out. Just place an online order through the "shop with me" link below. Make sure you see my name as the demonstrator you are purchasing from. Please note: If you choose "no contact" from demonstrator, I will NOT be able to see who you are to mail you your embossing folder. Once you place your order, email me with the item number and name of folder you wish to have at stampinartfully@gmail.com

The rumor is TRUE...


Read more about the Stampin' Up! Ultimate Bundle by clicking on the photo below. Time is running out for the best ever deal on the Stampin' Up! Ultimate bundle. Purchase the $99 starter kit plus 2 stamp sets of your choice! The extra 2 stamp set offer ends March 31! Click here to become a part of my team.


Do you have a Stampin' Up! demonstrator? If not, I would love to be your source for these amazing products (unless you want to take advantage of the opportunity above) and hopefully give you a good dose of inspiration from time to time. This is not just a hobby for me, it is a passion! Click here or on the header above to find out more info on how you can earn free stamp sets just by shopping with me. Earn Frequent Buyer Rewards!

Please use the hostess code shown in the top right corner when ordering online, unless your order will total $150 before shipping & tax. At that point, you become your own hostess and get all the rewards! 


As always, let me know if you have any questions about the project or the products used. Thanks for visiting my blog.

Artfully Yours,

Kim

Wednesday, March 22, 2017

Paisleys & Posies "Jewel Toned" Trio

When I made this first card today, it reminded me of doing some projects in school with what were called "jewel tones". I thought the color of Pacific Point really fit the bill, so I went on a hunt to find at least two more colors that I thought would work. All products Stampin' Up! 


The next color I chose was Emerald Envy. 


Melon Mambo seemed to be the perfect color to complete this trio of jewel toned watercolor cards. 


I made all of these cards in a little over 30 minutes. These are the type of cards I LOVE...artsy...looks like I spent hours, but in reality, very quick to execute. 

Cut 3 panels of watercolor paper 4 x 5.25 for the top layer. Using your Aqua Brush, do a simple color wash on each panel with your chosen three colors. I dried mine with a heat tool to speed things up.

Using clear block "F" (large background sized acrylic block), adhere all of the stamps you wish to use in a random pattern. That's right, you will stamp all images at once! Using Versamark, stamp all images at the same time on top of the watercolored backgrounds and emboss with Gold Stampin' Emboss powder. 

The strip for the sentiment is 1 x 4. I used Stampin' Dimensionals to adhere it to the front of the card. I ended up using another piece of watercolor paper (I love how thick it is) to layer under the main piece, but these cards would have looked great just adhered to the coordinating card stock also. The base layers are standard sized top fold cards with paper cut to 4.25 x 11 and scored at the 5.5 mark before folding in half. 

Supply list:


The Stampin' Up! Occasions catalog and Sale-a-Bration catalog links to the pdf versions are on the right side-bar.  For every $50 spent from any catalog (before tax & shipping) you earn a FREE item from the Sale-A-Bration catalogs.  The Sale-A-Bration catalogs are only good through March 31, 2017.

In addition to the items available in the Sale-A-Bration catalogs, Stampin' Up! released additions to the freebie list on March 21.  Again, you only have until March 31, 2017 to take advantage of the free items and they are only as long as supplies last.  


Please note that if you want one of the above for your freebie after spending $50 (before tax & shipping), you will need to use the item numbers below. 


The rumor is TRUE...


Read more about the Stampin' Up! Ultimate Bundle by clicking on the photo below. Time is running out for the best ever deal on the Stampin' Up! Ultimate bundle. Purchase the $99 starter kit plus 2 stamp sets of your choice! The extra 2 stamp set offer ends March 31! Click here to become a part of my team.


Do you have a Stampin' Up! demonstrator? If not, I would love to be your source for these amazing products (unless you want to take advantage of the opportunity above) and hopefully give you a good dose of inspiration from time to time. This is not just a hobby for me, it is a passion! Click here or on the header above to find out more info on how you can earn free stamp sets just by shopping with me. Earn Frequent Buyer Rewards!

Please use the hostess code shown in the top right corner when ordering online, unless your order will total $150 before shipping & tax. At that point, you become your own hostess and get all the rewards! 

As always, let me know if you have any questions about the project or the products used. Thanks for visiting my blog.


Artfully Yours,

Kim

Tuesday, March 21, 2017

Contemporary Art and New Saleabration Items!

I am often inspired by contemporary wall art I see on Pinterest. I absolutely love it when the painting has metallic paint added to the surface on top of the colors the artist has used. The card below was inspired by one of those pieces. All products Stampin' Up!


I used my #foolproofwatercolor technique to achieve the background color on this project. Click here for my very first blog post showcasing this simple technique. There is a pdf tutorial on that particular blog post. Click here for a video tutorial actually showing how I apply inks to paper with this technique. Step by step instructions for this project are below. 


Step #1  
Apply Crumb Cake & Smoky Slate inks with a baby wipe to the top portion of the watercolor paper. 

Step #2 
Apply Marina Mist & Smoky Slate inks with a baby wipe to the lower portion of the watercolor paper.

Step #3
Secure the watercolor paper to your work surface temporarily. Using torn scrap paper, mask all but an area just below the center of the panel. Temporarily secure the scrap paper. Using a Versamark ink pad, tap ink directly on the exposed area. 

#4
Heat emboss area covered with Versamark using Gold Stampin' Emboss Powder. The 2 last steps aren't shown, but I used the splatter stamp from Gorgeous Grunge to gold emboss the splatters above and below the gold strip. Once the gold embossing cooled, I used the Seaside Textured Impressions embossing folder to add even more interest and texture to this background. 


I finished this card off with a gold embossed sentiment from the 
Birthday Blooms stamp set, gold sequins and gold metallic thread. 


This card is actually very quick to make. The #foolproofwatercolor technique makes it easy! 

Supply list:


The Stampin' Up! Occasions catalog and Sale-a-bration catalog links to the pdf versions are on the right side-bar.  For every $50 spent from any catalog (before tax & shipping) you earn a FREE item from the catalog below. The Sale-A-Bration catalog is only good through March 31, 2017. 

Look at the new items! 


Please note that if you want one of the above for your freebie after spending $50 (before tax & shipping), you will need to use the item numbers below. 


The rumor is TRUE...

Read more about the Stampin' Up! Ultimate Bundle by clicking on the photo below. Time is running out for the best ever deal on the Stampin' Up! Ultimate bundle. Purchase the $99 starter kit plus 2 stamp sets of your choice! The extra 2 stamp set offer ends March 31!


Do you have a Stampin' Up! demonstrator? If not, I would love to be your source for these amazing products (unless you want to take advantage of the opportunity above) and hopefully give you a good dose of inspiration from time to time. This is not just a hobby for me, it is a passion! Click here or on the header above to find out more info on how you can earn free stamp sets just by shopping with me. Earn Frequent Buy Rewards!

Please use the hostess code shown in the top right corner when ordering online, unless your order will total $150 before shipping & tax. At that point, you become your own hostess and get all the rewards! 

As always, let me know if you have any questions about the project or the products used. Thanks for visiting my blog.


Artfully Yours,
Kim

Monday, March 20, 2017

Golden Feathers

I never seem to have trouble making a card suitable for a female. However, "man" cards are just a bit difficult at times. When I do come up with something that works for a man, I do a happy dance! All products Stampin' Up!


For this project, I embossed 3 of the feather images from the stamp set Feather Together using Gold Stampin' Emboss Powder on to watercolor paper. These images are meant to layer on top of each other, but I love the way they look with this technique. I actually lined them up on the block and stamped all of them at once. After I embossed them, I used the Memento Tuxedo Black ink refill as watercolor and just did a total black wash on top of the gold feathers. After it the piece dried, I tore the edges of the paper. I think the pop of the white torn edge really gives it a stylish look. 


The Hexagons Dynamic Impressions Embossing Folder really added some interest to this card. The impression this folder makes is DEEP. The tiny "Happy Birthday" is from the Sprinkles of Life stamp set. I would buy that stamp set just for the tiny words alone. I punched the words out with the Classic Label Punch. Added more gold accents and called it done. 


Supply list:


The rumor is TRUE...

Read more about the Stampin' Up! Ultimate Bundle by clicking on the photo below. Time is running out for the best ever deal on the Stampin' Up! Ultimate bundle. Purchase the $99 starter kit plus 2 stamp sets of your choice! The extra 2 stamp set offer ends March 31!


Don't forget to browse the new Stampin' Up! Occasions catalog and Sale-a-bration catalog. Links to the pdf versions are on the right side-bar.  For every $50 spent from any catalog (before tax & shipping) you earn a FREE item from the catalog below. The Sale-A-Bration catalog is only good through March 31, 2017. 


Do you have a Stampin' Up! demonstrator? If not, I would love to be your source for these amazing products (unless you want to take advantage of the opportunity above) and hopefully give you a good dose of inspiration from time to time. This is not just a hobby for me, it is a passion! Click here or on the header above to find out more info on how you can earn free stamp sets just by shopping with me. Earn Frequent Buy Rewards!

Please use the hostess code shown in the top right corner when ordering online, unless your order will total $150 before shipping & tax. At that point, you become your own hostess and get all the rewards! 

As always, let me know if you have any questions about the project or the products used. Thanks for visiting my blog.


Artfully Yours,
Kim

Saturday, March 18, 2017

The Rumor is TRUE...


Did you know that a great many of the people who sign up to be a demonstrator with Stampin' Up! do so ONLY for the discount on things they would purchase anyway? I welcome hobby stampers to my downline! Time is running out for the best ever deal on the Stampin' Up! Ultimate bundle. 


That's right. You never have to "sell" anything. You never have to hold a party or workshop. You WILL get the opportunity to see and purchase products before the general public gets a chance and you can sign up JUST for the discount YOU receive! 


However, if you have friends that like to stamp, this is a way for you to offer them a chance to play with and purchase Stampin' Up! products from you. 

Details: 
Purchase the $99 starter kit plus 2 stamp sets of your choice! The extra 2 stamp set offer ends March 31!


This is what you get with the $99 kit!
  • For $99 you choose:   Up to $125 worth of Stampin’ Up! product for your kit.  That’s $26 in FREE product.  Products in the kit can be from any current catalog, including 10% off bundles. The kit ships to you FREE, for another 10% savings
  • BONUS!  GET TWO FREE STAMP SETS of your choice (ANY PRICE) as a bonus with the $99 Starter Kit during Sale-A-Bration (Jan. 4 – March 31).  Host stamps excluded.
  • Buy everything you want at a 20% discount! After you purchase the $99 Starter Kit and join, you can stock up and save 20% or more on your favorite Stampin’ Up! paper, stamps, inks and tools PLUS earn more free and discounted products thru Stampin’ Rewards and Stampin’ Up! promotions.
  • Tease your friends with your ability to be FIRST! Preview and purchase new products a month in advance–one of my favorite benefits.
  • Earn extra money and/or free products!  Stampin’ Up! offers a fun opportunity to share your passion for stamping and earn extra income and product.  The choices are yours!
  • No risk.  From the time you join through the end of the first full Stampin’ Up! quarter you can “test drive” demonstrator discounts and benefits. Stampin’ Up! quarters are Jan. – March, April – June, July – Sept., Oct. – Dec.
  • No penalty to drop!  If you reach $300 in sales by the end of the first full Stampin’ Up! quarter, you renew your demonstrator discounts and benefits for another quarter. If you don’t reach $300 in sales, you can “drop” with no penalty.
  • Decide to do it JUST for you!  There’s no obligation to host workshops or parties, sell products to others or personally purchase anything beyond the kit!


Joining Stampin' Up! was the best crafting decision I have ever made. I have used their products since 1999 and think the quality is unparalleled in the paper crafting industry. If you have questions, please let me know. If you want to sign up under me and instantly become part of the Stampin' Pretty Pals virtual community, click here or on the Join Now picture above. 

Don't forget to browse the new Stampin' Up! Occasions catalog and Sale-a-bration catalog. Links to the pdf versions are on the right side-bar.  For every $50 spent from any catalog (before tax & shipping) you earn a FREE item from the catalog below. The Sale-A-Bration catalog is only good through March 31, 2017. 


Do you have a Stampin' Up! demonstrator? If not, I would love to be your source for these amazing products (unless you want to take advantage of the opportunity above) and hopefully give you a good dose of inspiration from time to time. This is not just a hobby for me, it is a passion! Click here or on the header above to find out more info on how you can earn free stamp sets just by shopping with me. Earn Frequent Buy Rewards!

Please use the hostess code shown in the top right corner when ordering online, unless your order will total $150 before shipping & tax. At that point, you become your own hostess and get all the rewards! 

As always, let me know if you have any questions about the project or the products used. Thanks for visiting my blog.


Artfully Yours,
Kim


Thursday, March 16, 2017

Fancy "Gilded" Handwriting

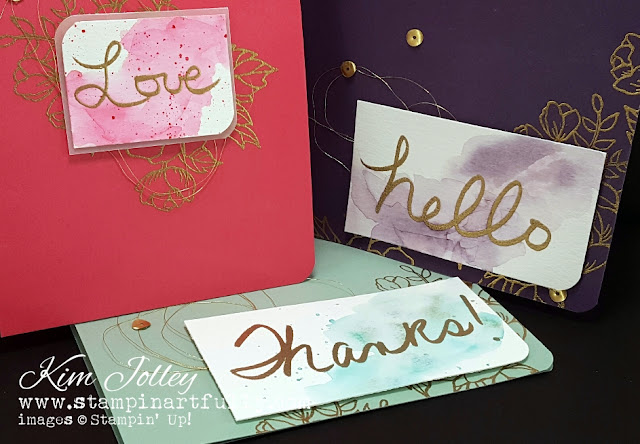
There are times when an idea pops in my head and it never works the way I intended. This time, my idea worked pretty well. I figured that since handmade cards are such a personal way to let someone know you are thinking about them, that it would be cool to be able to use my handwriting as part of the design. Keep in mind that even though I stay at the Holiday Inn Express, I'm not doctor. However, my handwriting is perilously close to looking like I'm signing a prescription order. I had to work hard to make the handwritten words on these cards look legible, but then again, EVERYTHING looks better when it is a fancy gold color! All of the words that are on the following cards were handwritten by me and gold embossed. What do you think?


The floral image I used on all cards is from the Stampin' Up! Birthday Blooms stamp set. I thought the largest image from this set was a perfect backdrop for my popped up gilded handwriting. 


The "wonky" shaped sequins are the Gold Sequin trim from Stampin' Up! I heat them with my heat tool and they end up deliciously misshapen. 


I used the corner rounder on my Stampin' Up! Envelope punch board to selectively round certain corners. 


I absolutely LOVE how they all turned out. 

How did I do it? 

I tried this method on various types of Stampin' Up! paper. I found that the colored and watercolor papers work pretty well, but the smooth Very Vanilla and Whisper White didn't really work well. 

This is something you need to be well prepared for beforehand, because you need to work quickly. I used the watercolor paper for my projects. I did the watercoloring after the embossing, because it doesn't seem to work well if you try this after you have watercolored the paper. The surface of the paper changes so much once it is wet, then dry, it just didn't work well. 

Trim your watercolor paper to the size you wish. Rub the Embossing Buddy over the surface of the paper, making sure you cover it well. Grab a Stampin' Write marker in a color of your choice and write your word. Immediately cover the written word with embossing powder, shake off the excess and emboss like you would any other embossing project. I used Gold Stampin' Emboss Powder for this project. Another tip: Use a coordinating color of marker to write your word. That way when you are watercoloring this piece after you emboss it, if there is any stray part of your word that didn't emboss perfectly, that little bit of color will just be included with your watercoloring. I used inks from the matching Stampin' Up! ink pads and an Aqua Painter to swish on the color. The gold embossed area will resist and just "pop" off the page once you watercolor it. (on a side note: I did use a bit of Bermuda Bay ink on the Mint Macaron project)


Don't forget to browse the new Stampin' Up! Occasions catalog and Sale-a-bration catalogs. Links to the pdf versions are on the right side-bar.  For every $50 spent from any catalog (before tax & shipping) you earn a FREE item from the catalog below. The Sale-A-Bration catalogs are only good through March 31, 2017. Keep in mind that the free items are in limited supply, so grab what you want now. 


Do you have a Stampin' Up! demonstrator? If not, I would love to be your source for these amazing products and hopefully give you a good dose of inspiration from time to time. This is not just a hobby for me, it is a passion! Click here or on the header above to find out more info on how you can earn free stamp sets just by shopping with me. Earn Frequent Buy Rewards!

Please use the hostess code shown in the top right corner when ordering online, unless your order will total $150 before shipping & tax. At that point, you become your own hostess and get all the rewards! 

As always, let me know if you have any questions about the project or the products used. Thanks for visiting my blog.


Artfully Yours,
Kim