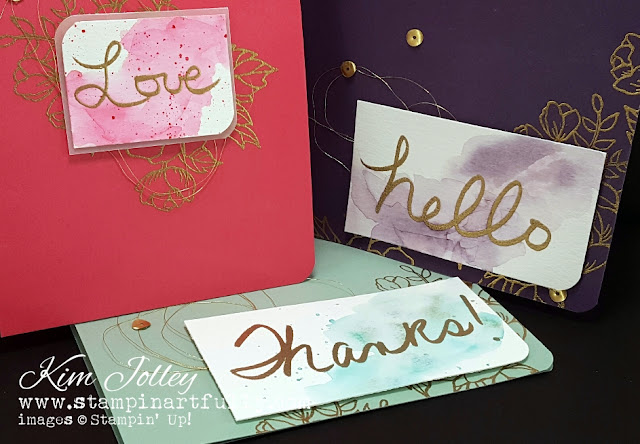
The floral image I used on all cards is from the Stampin' Up! Birthday Blooms stamp set. I thought the largest image from this set was a perfect backdrop for my popped up gilded handwriting.
The "wonky" shaped sequins are the Gold Sequin trim from Stampin' Up! I heat them with my heat tool and they end up deliciously misshapen.
I used the corner rounder on my Stampin' Up! Envelope punch board to selectively round certain corners.
I absolutely LOVE how they all turned out.
How did I do it?
I tried this method on various types of Stampin' Up! paper. I found that the colored and watercolor papers work pretty well, but the smooth Very Vanilla and Whisper White didn't really work well.
This is something you need to be well prepared for beforehand, because you need to work quickly. I used the watercolor paper for my projects. I did the watercoloring after the embossing, because it doesn't seem to work well if you try this after you have watercolored the paper. The surface of the paper changes so much once it is wet, then dry, it just didn't work well.
Trim your watercolor paper to the size you wish. Rub the Embossing Buddy over the surface of the paper, making sure you cover it well. Grab a Stampin' Write marker in a color of your choice and write your word. Immediately cover the written word with embossing powder, shake off the excess and emboss like you would any other embossing project. I used Gold Stampin' Emboss Powder for this project. Another tip: Use a coordinating color of marker to write your word. That way when you are watercoloring this piece after you emboss it, if there is any stray part of your word that didn't emboss perfectly, that little bit of color will just be included with your watercoloring. I used inks from the matching Stampin' Up! ink pads and an Aqua Painter to swish on the color. The gold embossed area will resist and just "pop" off the page once you watercolor it. (on a side note: I did use a bit of Bermuda Bay ink on the Mint Macaron project)
Don't forget to browse the new Stampin' Up! Occasions catalog and Sale-a-bration catalogs. Links to the pdf versions are on the right side-bar. For every $50 spent from any catalog (before tax & shipping) you earn a FREE item from the catalog below. The Sale-A-Bration catalogs are only good through March 31, 2017. Keep in mind that the free items are in limited supply, so grab what you want now.
Do you have a Stampin' Up! demonstrator? If not, I would love to be your source for these amazing products and hopefully give you a good dose of inspiration from time to time. This is not just a hobby for me, it is a passion! Click here or on the header above to find out more info on how you can earn free stamp sets just by shopping with me. Earn Frequent Buy Rewards!
Please use the hostess code shown in the top right corner when ordering online, unless your order will total $150 before shipping & tax. At that point, you become your own hostess and get all the rewards!
As always, let me know if you have any questions about the project or the products used. Thanks for visiting my blog.
Artfully Yours,
Kim


Looking great! I just wrote on an envelope...to make it match the card! I will have to try this technique and see if I like mine!
ReplyDeleteSpectacular!!! I love your creativity!
ReplyDeleteI love them too! They are beautiful!
ReplyDeleteAwesome job you did. I just didn't about it Thanks for "teaching something new"!
ReplyDeleteThe embossing powder really adheres to the marker? How fast do you have to do it? One letter at a time?
ReplyDeleteNo. I just wrote the entire word and immediately put the embossing powder on it. It adhered with no problem.
ReplyDeleteyurtdışı kargo
ReplyDeleteresimli magnet
instagram takipçi satın al
yurtdışı kargo
sms onay
dijital kartvizit
dijital kartvizit
https://nobetci-eczane.org/
XN7YCW