
I am so excited today! I am the Pals guest stamper over at Mary Fish's Stampin' Pretty blog. As I said before, I have thought about signing up as a demonstrator for Stampin' Up! for over 10 years. Started thinking seriously about it a few years ago after I stumbled on to Mary's blog. When I was ready to do it, she was the only person in the world I wanted to sign up under and I am so proud to be a part of the Stampin' Pretty Pals.
This project combines a cool little gift box that doesn't require tape or glue and the easiest DIY necklace & bracelet set you will ever make. YES, you heard me right. No glue or tape for the box. And, for those of you who know that I hate to throw away even tiny scraps of luscious paper, this jewelry project is another way to use them.

The paper was cut to 11 x 6". Using the Simply Scored board, I scored on the long side at 3, 4, 7 & 8" marks. I scored the short side at the .5, 1.5, 4.5 & 5.5" marks. After that, follow her instructions on how to cut and fold the box. Once you have done one, you won't even have to think about where to cut, it is just that easy. I used paper from the Designer Series Paper pack called Flashback. (You can make 2 boxes out of one sheet!) After assembling the box, I wrapped a 1" wide piece from one of the other papers in the group and the box (like you would a ribbon) to make a band that can be slid off. I cut tiny banners out of a third piece to make the little notched pieces under the sentiment. Links to all Stampin' Up! materials will be at the end of this blog post. The sentiment and tiny banner pieces are popped up using a double layer of Stampin' Dimensionals. The Pearl Basics embellishments were colored using a Cherry Cobbler Blendabilities. Those new alcohol based markers that come in some of the gorgeous Stampin' Up! colors are amazing. You can also color the Rhinestone Basics with them. So versatile! Sentiment was stamped on Very Vanilla card stock using Tuxedo Black Memento ink (my "go to" black ink), before being cut out using the smallest Deco Label die cut.

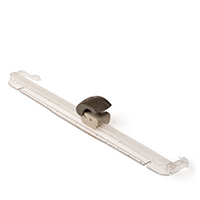
Ever need a gift that won't cost very much and that you have made yourself? If so, this is right up your alley. Go to a local pet store and pick up a bit of clear airline tubing that is used for fish tanks. I bought some in several diameters by the foot several years ago at a local pet store and it was extremely reasonable. The cording is some 2mm waxed linen I picked up somewhere for another project. However, you could also use so many other things to string these beads on, such as a combination of Stampin' Up!'s ribbon along with cord like this. My next necklace like this will incorporate ribbon. You basically cut some of the tubing to the desired width of your bead, and cut a small paper strip the same width. (It doesn't take much, I used scraps from the same Designer Series Paper I used for the box.) Then roll the paper around a skewer or tooth pick (depending on which size tube you are using) and insert in the tube. Using the tool you used, make sure the paper unfurls fully inside the tube. Thread your cord and any other beads you want to use and see instructions here to tie the adjustable double knot closure. To make the bracelet, wrap the cord around your wrist loosely and double the length and follow the same double knot instructions as for the necklace.

Wouldn't you love to receive this set as a gift? I think you could dress it up or down, but I am seeing this with a white t-shirt and jeans. This is the door prize I am giving away at my first Stampin' Up! workshop on July 22nd.

If you and your friends want to learn DIY projects like this one, contact me to set up a workshop. Thanks for stopping by my blog.
Artfully Yours,
Kim


How lovely!! both the box and the jewelry, thanks for the links to the directions on how to make this super cute box, I watched the video, really fun and easy.
ReplyDeleteThe bracelet and the necklace are really beautiful and easy to make too. I have that plastic tubing I use for my fish tanks so all I need is the cord.
Thanks again for sharing.
What a neat take on Stampin' Up! designer paper! Very crafty and very pretty. Thanks for sharing...enjoy the spotlight!
ReplyDeleteThank you, Kim. I love showing off your work and having you as part of the Pals. Such a clever idea.about the tubing.
ReplyDeleteI love how you're using this great DSP.
ReplyDeleteGreat idea, I haven't made any jewelry for a long time may have to try this out. In the past I've used long skinny pieces of dsp and made my own beads (rolled up) then sprayed them with clear outdoor poly spray, they held up well. I still have a few I'm wearing from about 4 years ago. Thanks for sharing.
ReplyDelete